1. Songs Rating
I began to score for the collection songs when iTunes rating function has been joined. There are 5 star levels for songs in iTunes. As for
me, I have classified songs as 3 star levels) for a user reference: favorable (3
stars), worth listening (4 stars), great (5 stars).
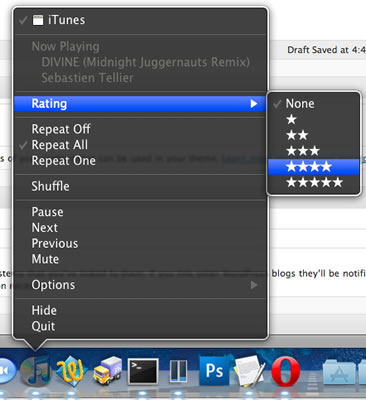
You can find the rating
songs in Star Bar and play them. Based on your own personal taste, or
preference order, songs are added to playlist in sidebar.
2. Add Comments
Strongly recommended, you can use smart list (such as music
type, performers category) function to create your own playlist. However, what
is the most convenient way, when we want to remove the songs with lyrics, or
establish a list for soft-rock music?

You can try the following method:
Select a song, and click the letter “I” in Keyboard, then
you can immediately enter into the songs information page. You can write your
comments on party song or dance song. After completing songs comments (description),
click OK. The third skill will mention about how to use comments to create a
list.
3. Create Smart Playlist
After the first and second steps, now we will add the songs
into smart playlist. Personally, I love this function so much. You can create
different smartlist by your rating songs or types of commented songs.

For example, according to the label” Clear” of my commented
songs, similar songs will be searched to form a song playlist.
4. Delete Duplicated Items
When burning to CD, we may meet this kind of trouble: there
are repeated songs in 2 CDs, which recorded by one singer. We should delete
them manually each time. However, it is helpful for ITunes to find these repetitious
songs. Delete or not delete, just depends on yourself.

Enter into Music Library, first select “show duplicated items”
from File menu, then all the repeated songs will be listed by iTunes, and you
can choose to delete or retain them. At last, pls select “show all files from
file menu” when finished.
5. Add Movies or DVD to
iTunes

We can buy or rent
movies from iTunes Store, even watch them on mobile device or Apple TV. You can
import videos from QuickTime, and then convert to the format you want by
advanced function menu.
6. Add Wish List

When browsing iTunes Store, many favorite videos/ audios
will be found. However, we may not want to buy them immediately, or they just
can be loaded by Mac users. To avoid searching them back and forth, I often add
these files to my wish list. When decided to buy, I can order them quickly in
iTunes Store.
7. Show more Columns

iTunes can display vast audios information in Music
Library, but some columns remains inactive state. You can find the view options
from view menu. Select views column in this part, you can open the information
you want to know. Also information can be turn off if you do not want to see. Functions
on checking file adding date, format, size are very useful.
8. Grip the Lost Art Schools

If burning songs from CD, iTune may
(Or may not) read art genre of works. And after
several minutes, this information will not be found.
If art genre information has lost, you can grip the
lost album genre from iTunes advanced menu. If there is related information in iTunes Store, you can select this operation to add
into songs information. If not found, typing the
letter “I” in keyboard and select a song at random, then enter into artistic
faction page, and found album in Amazon. After finding it, you can drag it to
window from browser directly.
9. Switch to Mini Player
Mode

You can switch to mini player mode by clicking the green
button in left side on iTunes window, which can turn iTunes into streamline
play. In order to remain iTunes Mini Player at forefront, you can set the
advanced parameter, so that you can find iTunes at any time.
10. Re-arrange iPhone/
iPod Applications

We can re-arrange iPhone apps by iTunes.
First, insert your iPhone or iPod Touch, and select in resource
window.
Second, click program tab, and drag applications you need,
or drag applications into right-hand column. Then you will re-arrange the
applications page.